

![]()
![]()
![]()
![]()
![]()
![]()
![]()
![]()
![]()
![]()
![]()
![]()
This web page is just an overview of the installation. For the complete instructions, download the installation manual for the type of DCI you are purchasing. Note - A printed manual is included with each DCI.
Wired DCI for JVC, Alpine, Clarion, Kenwood -
Installation & Operation Manual
Wired DCI for Sony & Pioneer -
Installation & Operation Manual
IR DCI - Installation & Operation Manual
Installation of the DCI is no more complicated than installing a new head unit. If you can handle typical automotive wiring projects you should have no trouble installing your own DCI. If you are not familiar with automotive wiring techniques you should seek professional help (I mean from an auto installer).
The basic installation requires connecting the DCI to 4 wires, all of which are available on my stereo adapter or at the factory stereo harness:
| Chassis Ground | |
| +12v from an Accessory or Ignition source | |
| The Dash Switch wire | |
| The Dash Mute Wire |
If you're using the wired Mute option or the SCV feature, you will need to make one or two more wiring connections.
Note that the Blue and Gray wires are for optional features, and are not required for the DCI to control your head unit. Here's another photo of how to wire the DCI using a screw terminal strip, which some users may find useful.

This diagram shows the optional stereo adapter supplied by Modifry Products, but it's possible to connect the DCI directly to the S2000 stereo wiring harness. Example - the purple MUTE wire on the DCI normally connects to the purple wire on the adapter, but without the adapter it would connect to the yellow/blue wire in the S2000 radio harness. If using a stereo adapter supplied by others, you will have to connect the DCI purple and green wires by splicing into the factory harness as described above.
The gray SPEED SIGNAL wire is optional, and can be left disconnected if you do not want to use the speed-controlled volume feature. If you decide to use it, connection instructions are included in the DCI Installation manuals at the top of the page.
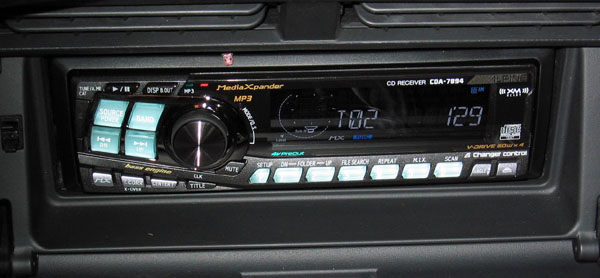 |
Photo of Alpine head unit with IR emitter installed. |
 |
Close-up of infra-red emitter. On this Alpine, the IR receiver is behind the "MediaXpander" logo, which is why the emitter is positioned directly above it. You can usually find the location of the IR receiver in your head unit manual. |